Thursday, June 28, 2012

My Letterpress Chronicles: Day 3

So I'm kinda late writing this post being that class is today in like 15 minutes. I'm waiting for my ride who decided to tell me that they were late once it became too late for me to make it to class on time. Hey why let them off the hook, they're driving me to class anyway....

Class last week Thursday, 21 June 2012 was AMAZING.  Step by step, we were taken through the journey of creating our very own PhotoPolymer Plates.  It is quite a process, but once grasped, there's no turning back.

I was running late to class late to class for the 1st time, (heading toward my 2nd time). -- But still, I wouldn't dare go through the entire class hungry.... LOL.. ---soooo right before class, I ran by Chipotle and got my trusty bowl made of brown rice, grilled chicken, lettuce and that tasty spicy red sauce my bottle of Poland Spring and I was off to class.


Of course the day I'm late, Mr. Faust began exactly on time and they were already at a paper cutter known as the guillotine, cutting our business cards down to size.  I caught the end and we all received our business cards.  After that, I finally got a chance to take a few bites, and next thing you know we're being called off to make our plates.  I was still hungry so it was kind of hard to put my bowl down, but I managed....lol


The Guillotine & Finished Business Cards.... 


So the process is kinda of long winded so I'm pretty sure you don't want me to type every single step.-- well I don't have to anyway.  After taking notes about every single step, I realized that the printed instructions were on the wall hanging above the PhotoPolymer Plate Maker... (GOOOOO ME!!!)

Anywho I have pictures of every step, all the way up to using the Photopolymer Plate. I hope you enjoy....

Transparency is needed to make the copies

After making 2 of the exact same copies of the selected image, this is what it should look like coming out of the copy machine

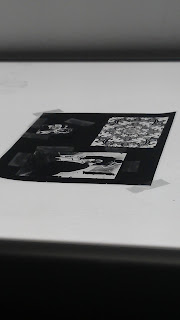
One copy is placed on the light table tape down the corners to minimize movement

Place a cut out of the 2nd copy of the selected image and place it directly over the image taped to the light table (They have to match as closely as possible)

The Big Thang here is the Exposure Unit you place the images in here in between two PhotoPolymer Plates

This is the PhotPolymer Plate after it finished drying


A set of completed plates. (there are 7 different images)


Here are the Directions, I placed them close to last because this is when I became aware of their existence...LOL


My Photopolymer Plate: I selected a wedding photo

This is a plate base that will make the Photopolymer Plates type high so we are able to use them to print

See...dnt they look great inked up.. :-)


Last But Certainly not least, the finished product!!!!


Till Next Time

Meagan


Tuesday, June 19, 2012

My Letterpress Chronicles: Day 2

......So, it was another awesome day of class last week Thursday.  The class was even better than the first.  It's seems, so far, that each class will build upon one another.  One reason this class was even better is because I wasn't hungry for 3 1/2 hours like I was during the first class.  

......While I sat waiting for class to begin (mind you, I was 30 minutes early) 7 minutes before 6pm, it dawned on me that while I enjoyed my first class immensely -- a gray shadow known as hunger hovered over it, taking some of the joy out of my experience.  Once the thought hit me, and processed, I jumped out of my seat, grabbed my wallet & my trusty Sensation 4G from Tmobile [which I absolutely adore]---and I headed out in search of something healthy, tasty and fufilling....(arghhh this weight loss journey...LOL)

......I made it downstairs, walked out of the building, turned left and headed for 6th Avenue aka Avenue of Americas.  There had to be something there. ---And WAH-LAH Chipotle!!!...Right on 6 Av between W21st and W22st, I found my haven. PERFECT. I ordered a bowl composed of brown rice, black beans, grilled chicken, some crazy spicy red sauce, and lettuce...(I resisted the tempting and o so tasty Tortilla chips that I wanted soooo badly)....added a Poland Spring water and I was good to go...

 
The Meal that made the hunger shadow Disappear!!!

.....So class started and Mr. Faust jumped right in and let us know that we would be printing our very own business cards.  I was ecstatic.  After printing our business cards, we were to move on using the photos that we brought in to create our very own photo polymer plate.  Note:  I called it a Palmer Photo Engraving Plate in my blog about Day 1.  So please forgive me.  Once again the correct term is Photo Polymer Plate.

.....As Mr. Faust began speaking about how we would go about making our business cards, he mentioned different types of font that were good for our business cards.  From what I was able to catch while taking notes, he mentioned: Universe, Clarendon, Furtura, and Century Expanded.  Once Mr. Faust completed his discussion about fonts, he handed each of us our very own composing stick.  We quickly recapped how to properly hold the composing stick and we were off...

The first line of my business card
at this point I had the composing stick facing the wrong way..smh...LOL


......I must admit that I was uber nervous and not confident about making my first business card on my own but once I began and got myself together, I had soooooooooo much fun.

.....I had already began building my card when I realized I was holding the composing stick improperly.  Thankfully the letters were correct.  Trust me, it takes time to place each individual letter plus proper spacing in place, so I was glad that this was an easy fix.  All I had to do was flip the composing stick.  

The proper way to hold a composing stick: Upside down, reading from left to right


.....For my card, I chose to go a little traditional.  I selected Century Expanded 24pt. for my top line (my name) and Futura 18 pt. for the rest of the card.  I was the last one to finish but, that's alright.  Once I finished composing my card, I was added with the rest of cards composed by the class. Mr. Faust wanted to only use one sheet of paper.  It totally makes sense being to the fact that business cards are generally small, so there was no need to waste paper.

Our cards ready for print on the Vandercook Universal 1

.....Each of us had the opportunity to print after Mr. Faust printed a couple of times.  I must say, even though I printed the same job a few times to get the roll technique going --- I can't ever see this getting boring, EVER.


Behold the Printed Product


.....It took a little longer than expected for all of us to finish so we didn't get to move on to the Polymer Photo Plates.   This coming Thursday, we are supposed to cut down our business cards and make our plates.  I can't wait for Thursday to get here!!!!

.....That's all folk....I hope you enjoyed reading about Day 2 of My Letterpress Chronicles...


'Til Next Time
Meagan


Thursday, June 14, 2012

So I Began My Introduction to Letterpress Class at SVA....

Hey...people...first I would like to say...I apologize for taking 4ever and some days to post a new blog....between...work...my endo...and regular life...blogging and my card journey kind of took a hold....but I'm back... persevering and moving forward.

As mentioned in my first blog.  I am a greeting card maker..Mainly handmades but with a gift...if you truly love it...one must enhance their skill and try to learn as much as they can to add..........and add
....and add some more.....So to add to my skill....I have embarked on a new road in my journey.  I have always wanted to learn how to letterpress.  After searching and searching tirelessly for an internship or apprenticeship to teach my about the art of letterpress (without any luck) --- I finally came across a class {that I of course had to pay cash for} at the School of Visual Arts; also known as SVA ...Yes the money may have set me back and with my first class behind me, I already know that it was O so Worth it!!!

My class is being taught by none other than Dikko Faust of Purgatory Press...Like how cool is that..???..I am past excited and honored.  I must admit that I really knew nothing about actual letterpress itself.  I knew about some machines that were used but that's about it.  So with my eagerness to learn I sat in my first class Thursday, 7 Jun 2012 at 6pm a blank canvas.  I am glad to say I now have some specs of paint on me.

Last week we learned about Pica versus points, ligatures such as: ff, fi, fl, ffi, and ffl typeface, ascenders and descenders but my favorite part of course was the fact that I had my very first letterpress experience.  We were allowed to use the Vandercook Universal 1...and I must say I haven't been that excited in a really long time...It was sooooo amazing....

Today will be my 2nd class and we will have the opportunity to create our very own Palmer Photo Engraving     Plate.  I the photo I chose to create the plate is good enough....anywho..I'll get into Palmer Photo Engraving more after my 2nd class tonight.

For now...enjoy the pictures of my experience at my very first Letterpress class session... :-)

The Vandercook Univeral 1 --Up Close & Personal

The Vandercook Universal 1 --Taking a Step Back

Last But definitely not Least
My very 1st Letterpressed Material!!!!


Till Next Time

Meagan