Tuesday, December 4, 2012

An Awesome Holiday DIY!!!

Hey Everyone the holidays are no longer approaching us, they are here!!!...With the holidays here most of us are on the move.  Whether it be buying presents, visiting family, or prepping for hosting a big dinner at your home; time is of the essence.  For all of you crafters out there here is a fun, simple, holiday card that won't consume too much of your time, and you would be proud to send out to all of your family and friends. It's even appropriate for those of you who give holiday cards at your place of business.

I gave this card to my former supervisor last year Christmas and she loved it.  I thought it would be fun to share as a DIY.  This is my my first time posting a DIY so please be gentle with me...LOL...

Sooooooooooooooooooooooooooooooooooooooo.....here we go!!!

Supplies Needed 
1 Piece of cut and scored cardstock measuring 6x6 (when folded) 
1 6" piece of ribbon (to go across the card)
1 8" piece of ribbon (to tie the bow)
1 pair of scissors
Clear  Hanging Ornament Stamps (of your choice)
Acrylic Stamping Block (size needed depends on stamps you choose)
Stamp Cleaner 
Paper Towel


Step 1
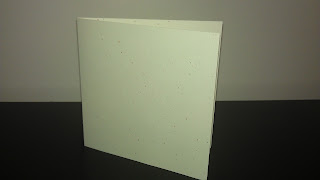
Make sure you have all of your supplies.  You don't want to have to go back and forth looking for things.  (Scissors aren't pictured here)

Step 2
Begin with your already cut and scored cardstock (color & size of your choice)                                       For this DIY we will be using a 6x6 card

Step 3
The real fun begins. You take your clear stamp that has been placed on your acyrlic block, ink it up         (with the color/(s) of your choosing)  
For this DIY I chose Danbue Blue, Bahama Blue, & Summer Sky From Memento

Step 4
Take your 6" piece of ribbon and place the adhesive on it
I used my Scotch 3M Advanced Tape Glider for this
After you place the adhesive or your 6" piece of ribbon you take your 8" piece of ribbon and place it about an inch from the right end of the 6" piece of ribbon
This will prepare you for the tying of the bow
I call it "The T before the bow tie"

Step 5
After you make "The T before the bow tie" you place it on the card about and inch above the bottom of the card with the 6" portion of the ribbon being horizontal and the 8" piece of ribbon lying vertically

Step 6
The final and last step.  Here you get to tie the bow

Step 7
Always Remember to clean your tools!!!

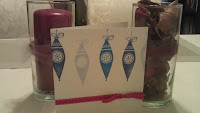
And for an added treat.. The finished card next to some pretty candles at my house and the same DIY on a 5x7 card at my desk last year. 


Anywho folks, I hope you will enjoy making this card as much as I did.  Remember you can change ink colors, cardstock color, stamps, card sizes and ribbon colors.  The choices are practically endless.        Make this your own!!!


Share with me your thoughts and comments.  If you would like to share how you made this card your own tweet me @DZignsbyMSDavis and #HolidayDIY ...

Hope to hear from you all Soon

Meagan


Tuesday, November 27, 2012

Bring On the 1 Year AnNiverSary!!!

Now that...the wedding is over...dancing the night away at the reception has passed...and you've returned from your honeymoon.... a whole yr has passed... 

Yes, one year is gone... 365 days ...8765 hours ..... 525,600 minutes *in my RENT voice* ....LOL... 

However you want to put it.... this is one of your first milestones as a married couple and it deserves to be recognized and celebrated...


My husband, Escamillio and I (Meagan) were married in the spectacular borough of BROOKLYN in NYC, June 30 2011!!!

As we grew closer and closer to our one year anniversary, we put a lot of thought into how would we celebrate it....Now if you're anything like I am, you want a fun yet cost efficient way to make that happen...especially after paying for a wedding only a year ago...  

My husband and I brainstormed and we came up with two ideas. We would: eat the top of our wedding cake and have an anniversary photo shoot...


             Coney Island
Our photo shoot would take place at world the famous Coney Island Amusement Park.  This amusement park whose history can be traced as far back as 1897 served as a perfect background to our pictures.  It was full of life, color, and fun.

Now on to the best part of this post:  The PICTURES.  I would like to credit my younger cousin Mariah who graciously accepted the role of photographer for the day... :-) Also if you notice an o so cute toddler in our photos, that would be my little cousin whom we happened to be taking care of for almost a year around the time our anniversary rolled around.  See, lots of things happen in a year...even more of a reason to celebrate making it!!!

no doubt she deserves to be the center of attention!!!
for and added touch of color & tribute to my wedding day I wore my wedding shoes....
we went across the street to the train station for some subway love :-) 

I love how much they love each other

  Aren't we super cute???... :-)


And no trip to Coney Island would be complete without a trip to NATHAN'S


I hope you've enjoyed the pics I've shared...and remember, no matter how you choose to celebrate your anniversary, make it fun and make it memorable. 


See you for year number 2...

Meagan


Monday, November 19, 2012

Just saying: HELLO!!!

Hey all,

I know I haven't posted anything for a while.  It's been quite a few months.  So much has happened.  I just wanted to say hi to everyone who takes the time to read my blog and let you all know that there will be so many things that will be posted in the near future....I'm just so excited about them all.  Can't wait to share them with all.

Til nxt time,

Meagan

Thursday, July 26, 2012

My Letterpress Chronicles: Day 6

Welcome to another wonderful post about letterpress... :-) .. The sixth day of class was great.  We didn't learn any new machines but we got to finish working on projects on our own.....so there won't be lots to say or type just a few pictures.

Last class, which is posted as Day 5, I began working on my shirt, but I was one of the three students who did not get to complete their shirt. Soooooooooooo, I completed it on Day 6. 

Of course as always I cannot focus while hungry so before class began I ran to my now staple Thursday meal at Chipotle.  Tasty brown rice, grilled chicken, black beans, lettuce, a little cheese and some spicy red sauce...YUM...   

In the last post, I showed you a picture of the letters I put together for my T-shirt....here are those letters inked up 
So I came up with this phrase "Southern Girl + Breuckelen Swag."  It kind of speaks to who I am as a person. ---you know just a little of my history....  Southern Girl speaks to the fact that my family roots stem from the great state of South Carolina.   I used to live down there with my grandmother once upon a time.  Because of it I do have some southern ideologies and mannerisms. Breukelen Swag speaks to me being more of me.  I did most of my growing up in East New York, Brooklyn.  I chose to spell Brooklyn the old dutch way on the shirt just because.... So my South Carolina ways and my Brooklyn demoneour make me more .Meagan..... sooooo here's my sample shirt....more .Meagan..... sooooo here's my sample shirt....   
The State color for S.C is Blue as well as NYC...NYC has a secondary color which is yellow so I chose that...I think the two colors work well together...I just swapped them

I began working on some other things but I will share them in a later post...well that's it for this post...hope you enjoyed it...


Til Next Time,

Meagan

Thursday, July 19, 2012

My Letterpress Chronicles: Day 5

For Day 5 of class last week on 12July2012, we moved from the Vandercook Universal 1 to the Vandercook No. 2 Proof Press.  This proof Press rocks for printing on cotton T-shirts.  We also use wood-type instead of metal type.  The reason for this is:  wood-type doesn't collect cloth marks like metal type.
                                                      Happy WoodType...LOL

The Vandercook No. 2 Proof Press can be used with a plastic sheet, but it was designed to be used with a galley tray.  Although you have the ability to use either a plastic sheet or a galley tray- - you should never use both at the same time.

A Large Galley Tray

Moving right along to printing, you need blotter paper or a piece of cardboard to be placed inside of the shirt. (the size of the cardboard/blotter paper depends on the project)  Once you have this you should already have nicely rolled out ink to ink your letters with... Note:  when inking the roller lift at the end of each stroke
                                   Blotter Paper Inside Shirt

Inking the roller

                                        Inking the Letters


After your blotter paper/cardboard is placed in your shirt, you remove all of the wrinkles from the location you will be printing on.  You then place the shirt on top of the letters. Lastly place an etching blanket (or some felt material if you have it lying around) and place it over the t-shirt before rolling.
                           The Etching Blanket Over the Shirt

I had soooo much fun learning how to use the Vandercook No. 2 Proof Press.  I must admit, it was a bit easier to learn how to use than the Vandercook Universal 1.  How cool is it that you can use the print to letterpress T-shirts?  The entire class made shirts. I was one of the 3 people who didn't get to finish their shirts on Day 5 so you will see the finished product on Day 6....but...I will give you a sneak peak of what my shirt will say and how the letters will be arranged.

                                                       Some Finished Products


                                            This is what my shirt will say!!!!


'Til Next Time

MEAGAN

Wednesday, July 11, 2012

My Letterpress Chronicles: Day 4

So this post is rather late.  YIKES.  This post is about my class that took place on 28 June 2012.  So late would definitely be an accurate description.

A couple of weeks ago in class, we stepped into the world of collagraphy.  Collagraphy is a printmaking process in which materials are applied to paperboard or wood.  While collagraphing, you can use all types of objects to create your collage-like work of art.  We used all sorts of items like:  bracelets, zippers, placemats, and even bobby pins & an earplug (courtesy of me #hehe)...

In Collagraphing 3 things are very important to the process when using a Vandercook Universal  1. Those things are:                                                  
                   A Wood block to make sure the objects are type high, 
                A Type High Gauge to measure the height of the objects ensuring they're all are the same or around the same height
                Double sided tape to stick the objects on the woodblock (Good Quality Double-sided tape)
     Type High Gauge w/some items being measured on a wood block

           
Once you have all of those things included the objects you want to put onto the woodblock you are pretty much ready to go......

Some items with doublesided tape inked and ready to go
As you can see some items include a     paperclip, a coin, a piece of material

        
Woodblocks with our selected items ready for print


Once we finally began printing, we created different variations of collagraphs from our selected items.  The collagraphs may be similar but no two are alike... Check out some of our prints!!!!


Can you tell the difference between each collagraph ???


Or do they all look the same to you????


Well I hope you enjoyed Day 4 of my Letterpress Chronicles....I'll be writing really soon especially since this post is uber late......

Til Next Time,

Meagan

Thursday, June 28, 2012

My Letterpress Chronicles: Day 3

So I'm kinda late writing this post being that class is today in like 15 minutes. I'm waiting for my ride who decided to tell me that they were late once it became too late for me to make it to class on time. Hey why let them off the hook, they're driving me to class anyway....

Class last week Thursday, 21 June 2012 was AMAZING.  Step by step, we were taken through the journey of creating our very own PhotoPolymer Plates.  It is quite a process, but once grasped, there's no turning back.

I was running late to class late to class for the 1st time, (heading toward my 2nd time). -- But still, I wouldn't dare go through the entire class hungry.... LOL.. ---soooo right before class, I ran by Chipotle and got my trusty bowl made of brown rice, grilled chicken, lettuce and that tasty spicy red sauce my bottle of Poland Spring and I was off to class.


Of course the day I'm late, Mr. Faust began exactly on time and they were already at a paper cutter known as the guillotine, cutting our business cards down to size.  I caught the end and we all received our business cards.  After that, I finally got a chance to take a few bites, and next thing you know we're being called off to make our plates.  I was still hungry so it was kind of hard to put my bowl down, but I managed....lol


The Guillotine & Finished Business Cards.... 


So the process is kinda of long winded so I'm pretty sure you don't want me to type every single step.-- well I don't have to anyway.  After taking notes about every single step, I realized that the printed instructions were on the wall hanging above the PhotoPolymer Plate Maker... (GOOOOO ME!!!)

Anywho I have pictures of every step, all the way up to using the Photopolymer Plate. I hope you enjoy....

Transparency is needed to make the copies

After making 2 of the exact same copies of the selected image, this is what it should look like coming out of the copy machine

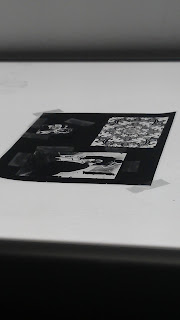
One copy is placed on the light table tape down the corners to minimize movement

Place a cut out of the 2nd copy of the selected image and place it directly over the image taped to the light table (They have to match as closely as possible)

The Big Thang here is the Exposure Unit you place the images in here in between two PhotoPolymer Plates

This is the PhotPolymer Plate after it finished drying


A set of completed plates. (there are 7 different images)


Here are the Directions, I placed them close to last because this is when I became aware of their existence...LOL


My Photopolymer Plate: I selected a wedding photo

This is a plate base that will make the Photopolymer Plates type high so we are able to use them to print

See...dnt they look great inked up.. :-)


Last But Certainly not least, the finished product!!!!


Till Next Time

Meagan